Deep Dive: Character Animations
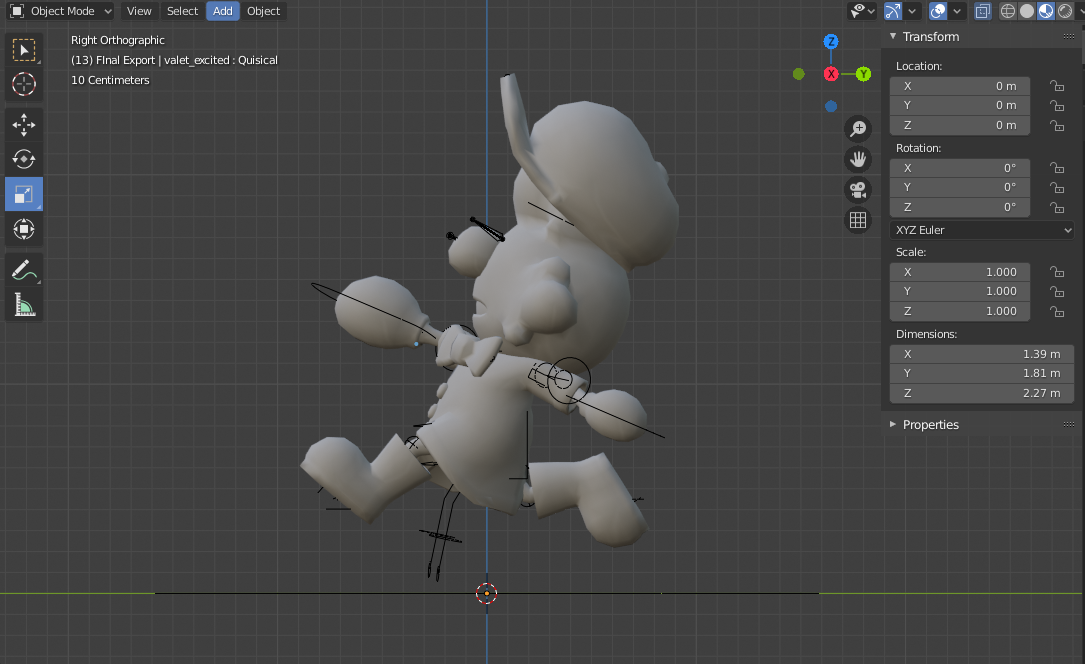
When making a character based game like Very Very Valet, it's essential for the character animations to be terrific. Creating and implementing high quality animations on budget and in scope is a challenge - especially with 6 characters to animate and a team of just 2 people!Our solution was to use an animation curve that defined how to move between single frame poses. For instance, a run cycle is just one curve with two unique key frames - and that's it!


Before you applaud this streamlined approach, know that we did not start with this system! In the prototype, we simply animated everything...after all that's how animation is done when working with a full team. We quickly realized this method wouldn't work - both because of quality AND time. Our characters felt loose, robotic, and plain bad. Continuing with "full" animation would inevitably lead to heartbreak. A new solution was needed.Enter David Rosen’s impeccable Animation Bootcamp GDC Talk (YouTube), where he covers a wide range of clever techniques for animating on a budget. The core idea is to only animate poses, and then interpolate between them. A 30 frame run cycle becomes just 2 frames and a curve. And from there you can build out an entire character!(As an aside, his visualization for locomotion is so good! Movement “spins” a wheel representing the different poses in the walk cycle. So to change a character’s walk means to adjust the radius of this wheel. Sometimes it’s the simple things that amaze).With this is mind, we implemented systems as needed. A non-humanoid rig doubled the clips (mirror poses), but boosted performance. “Secondary animation” is rad, but doesn’t read with our game camera. We ended up defining a character’s gait in the pose data rather than manipulate the root transform. Once the core system was implemented, out characters were already looking better and feeling snappier. Lots left to polish…but this is going to work!Improvements came from adding pure visual state to the characters - meaning no underlying mechanical changes. A big one was introducing a "scramble" when moving from walk to run. Moving into the run threshold temporarily speeds up the run cycle. It's really simple, but feels leagues better than a direct blend between walk and run. The scramble also increases the rate that dust particles are formed, inspired by the eternal muse that is Super Mario 3D World (YouTube).
Sometimes improvements came from adding “fake” state on top of movement. Our character controller has no sense of “skidding” when changing directions - seeing the visual feels great though! Same goes for quickly rotating the joystick and watching your valet spin. Landing with a little extra flourish (To be fair, confetti particles don't hurt either). None of these visuals made any change to the underlying movement, but make all the difference when playing.
From this point it’s a matter or iterating, iterating, and iterating! One of the best features of this approach is how few levers are at your disposal. You either change a pose, or change the curve. In other words, input into this system has clear output. That connection is supremely important when polishing!All in all characters have about 50 poses in total: running, jumping, driving, shoving, skydiving, you name it. We would be hard pressed to understate the effectiveness (and achievability) of this approach to animation. Doubly so with multiple characters and a small dev team. It also provides focus on the most important aspect - crafting strong animations!Additional Notes
Squash and stretch is almost impossible to overdo! These values were adjusted to the point of being Too Much™ when looking up close - but in action (especially on a small screen) it reads perfectly. It's amazing just how much this technique obscures the single pose nature of some animations, whether shoving or falling or jumping.Characters have an additional “emote” layer made of blend shapes, particles, and dynamic eyes. These can be triggered over any animation, giving actions that little extra oomph. The eyes in particular have several options - the shape and placement of each lid, as well as the pupil. A lot of character can be defined by their, uh, resting eye face!
Like any small team, when you build a system you want to use it everywhere. So we went ALL IN on this approach! Idle poses, results animations, and level briefings all utilize this system of poses and curves. Even with the numerous limitations, it’s surprising just how far it can be pushed!
Moving character rigs from Blender to Unity can be tricky, especially when using tools like Rigify. We wrote up a tutorial for how we achieved this (Toyful Games) - by no means the only/best way, but good enough to ship with!There’s so so many great animation resources out there! These two channels in particular were essential in eking out the very best from our characters: